

How To Wipe A Macbook Pro Clean
Following in the footsteps of the iPhone and iPad, Apple silicon Macs and Intel Macs with a T2 security chip (2017-2020 models) now have an "Erase All Content and Settings" option available in macOS Monterey. This article explains what the option does and how and when to use it.
Traditionally, wiping a Mac and returning it to factory settings involved manually signing out of a range of services, erasing your Mac's internal drive, then reinstalling macOS. These steps are quite involved, especially when you consider how easy it is to wipe an iPhone or iPad. Doing so is simply a matter of selecting an option in iOS called Erase All Content and Settings (found in Settings -> General -> Transfer or Reset iPhone).
Fortunately, with the release of macOS Monterey, Apple has brought the same option to the Mac. Erase All Content and Settings in macOS offers a very simple and straightforward way to erase your Mac without needing to reinstall the operating system. Thanks to the way storage is encrypted on Macs with Apple silicon or the T2 chip, the option is able to instantly and securely "erase" all user date by destroying the encryption keys.
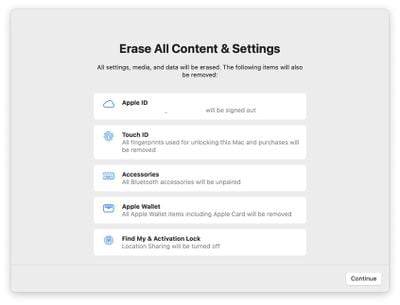
Not only does this effectively erase all user data and user-installed apps from your Mac without reinstalling macOS, it also signs out your Apple ID, removes your Touch ID fingerprints, purchases, and all Apple Wallet items, and turns off Find My and Activation Lock, making it far easier to restore your Mac to like-new factory settings.
The following steps show you how it's done. Whether you simply want to start fresh with your Mac or are planning to sell or gift your computer to another person, after erasing it using this option, your Mac will display the Setup Assistant and be ready to be set up like new.
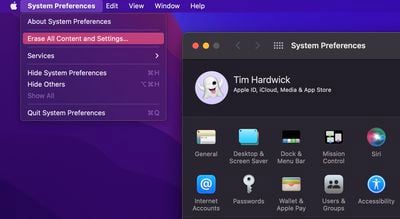
- Click the Apple () symbol in the menu bar and select System Preferences....
- When the preferences pane appears, select System Preferences -> Erase All Content and Settings from the menu bar.
- Enter your admin password in the Erase Assistant dialog prompt and click OK.
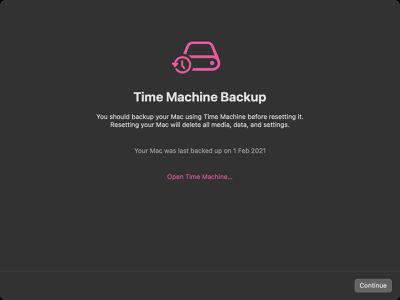
- If you haven't already backed up your important data, heed the onscreen Time Machine advice. Otherwise, click Continue.
- Note all the settings, data, media, and other items that will be removed. Click Continue if you're sure.

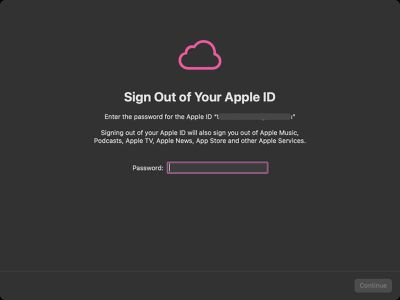
- Click to sign out of your Apple ID, then click Erase All Content & Settings in the prompt to confirm.
After following these steps, allow the erase process to complete. Your Mac may restart more than once during the process. Once finished, you'll see the "hello" message on your Mac's screen, indicating that your Mac has been restored to factory settings and Setup Assistant is ready to start anew.
Related Stories
How to Clean Install macOS Monterey Easily Using the New Erase Mac Option
Monday October 25, 2021 1:45 pm PDT by Tim Hardwick
Apple today released macOS 12 Monterey, and whenever a new operating system is released for the Mac, some users prefer to perform a clean installation. This article explains how to perform what is effectively a clean install of Monterey using a brand new option that's available on Apple silicon-powered Macs and Intel Macs with a T2 security chip. Clean installing macOS is often done to...
How to AirPlay Music and Video From iPhone or iPad to Mac
Monday November 1, 2021 11:48 am PDT by Tim Hardwick
Thanks to the release of macOS Monterey, Apple has introduced full AirPlay support on Mac, which means you can now AirPlay content from an iPhone or iPad straight to your Mac, or even from one Mac to another Mac. With Monterey installed, your Mac can also function as an AirPlay 2 speaker source, allowing you to wirelessly stream music or podcasts from an Apple device to a Mac or use the...
How to Use FaceTime's SharePlay Feature on Mac to Watch Movies and TV Shows Together
Monday November 8, 2021 11:08 am PST by Tim Hardwick
Note: The SharePlay feature in FaceTime requires macOS Monterey 12.1, which is only available to beta testers at the time of writing. Expect Monterey 12.1 to be released to all users in late fall 2021. In macOS Monterey, FaceTime received some major enhancements on the Mac, including the ability for you to share your screen with other people on a video call. Officially called SharePlay,...
How to Erase an M1 Mac
Tuesday March 2, 2021 11:25 am PST by Tim Hardwick
This article explains how to erase (or format) the built-in startup disk of a Mac with Apple silicon. Note that erasing your Mac permanently deletes all files on it, so follow the backup advice carefully. If you plan to give away, sell, or trade in a Mac, erasing your Mac should be the final step. First, Back Up Your Data Before you do anything, you should back up the files on your Mac. You ...
macOS Monterey 12.1 Beta: How to Share Your Screen on a FaceTime Call
Monday November 8, 2021 1:01 pm PST by Tim Hardwick
In macOS Monterey 12.1, which is available in a beta capacity right now, Apple introduced its new SharePlay feature to FaceTime. Previously only available on iPhone and iPad, SharePlay allows you to share your Mac's screen with other people on a FaceTime call, which opens up new possibilities for sharing experiences with friends, family, and co-workers. Thanks to SharePlay, you and others on ...
macOS Monterey: How to Make Your Mac User Profile an Animated Memoji
Wednesday October 27, 2021 8:43 pm PDT by Tim Hardwick
In macOS Monterey, you can use an animated Memoji as your Mac user profile instead of a standard static image. Of course you could always use a still photo of yourself to welcome you at startup and on the Lock Screen, but where's the fun in that? Keep reading to learn how it's done. Click the Apple () symbol in the menu bar and select System Preferences.... Click Users & Groups in the...
How to Make an App's Menu Bar Fit Below a MacBook Pro's Display Notch
Friday October 29, 2021 11:53 am PDT by Tim Hardwick
When Apple unveiled its new MacBook Pro models with a notch to house the camera in the thinner display bezel, many users saw it as a potential problem for third-party apps that place additional content across the menu bar, such as menus that extend from the left or menu items that extend from the right. However, it turns out Apple was wise to the potential issue of having menus or menu items ...
How to Hide the MacBook Pro Notch
Monday November 1, 2021 11:46 am PDT by Tim Hardwick
Apple's 2021 MacBook Pro models unexpectedly came with a display notch, or as Apple calls it, a camera housing, which sits dead center at the top of the screen. This article covers all the ways you can conceal the notch or at least make it play nice with your apps using software-based solutions. The inclusion of a notch on the redesigned 14-inch and 16-inch MacBook Pro allowed Apple to slim...
How to Change the Refresh Rate on Your MacBook Pro Display
Wednesday November 3, 2021 4:27 pm PDT by Tim Hardwick
Like the Apple Pro Display XDR, Apple's 2021 14-inch and 16-inch MacBook Pro models offer professional-level display performance and customization options. This article focuses on how to change the refresh rate of the display on the new MacBook Pro. For its redesigned MacBook Pro models, Apple pulled out all the stops to make the new Macs more attractive to professional users. In doing so,...
How to Install the macOS Monterey Public Beta
Thursday July 1, 2021 10:56 am PDT by Juli Clover
Apple has made a macOS 12 Monterey beta available for its public beta testing group, letting public beta testers try out the software before it launches this fall. The macOS Monterey Public Beta is available to anyone with a compatible Mac and it does not require a developer account. This guide walks you through some simple steps on installing the beta software. Before downloading the...
How To Wipe A Macbook Pro Clean
Source: https://www.macrumors.com/how-to/erase-all-content-and-settings-mac/
Posted by: wrightbrev1976.blogspot.com
0 Response to "How To Wipe A Macbook Pro Clean"
Post a Comment